The Pixie Trail is not an official site of The Walt Disney Company. Content of ThePixieTrail.blogspot.com is (C)copyright Cynthia Fragozo. Website content may not be reproduced in whole or in part without 'the prior written permission of ThePixieTrail.blogspot.com

Pages

Showing posts with label Pixie Portions. Show all posts

Friday, July 1, 2011

Peach & Strawberry Cobbler

Today for Fun Food Friday:
I was kindly reminded by a reader that I had yet to post the recipe I got from
Disney's(r)Whispering Canyon Cafe.

I simply asked. And I was presented with this!
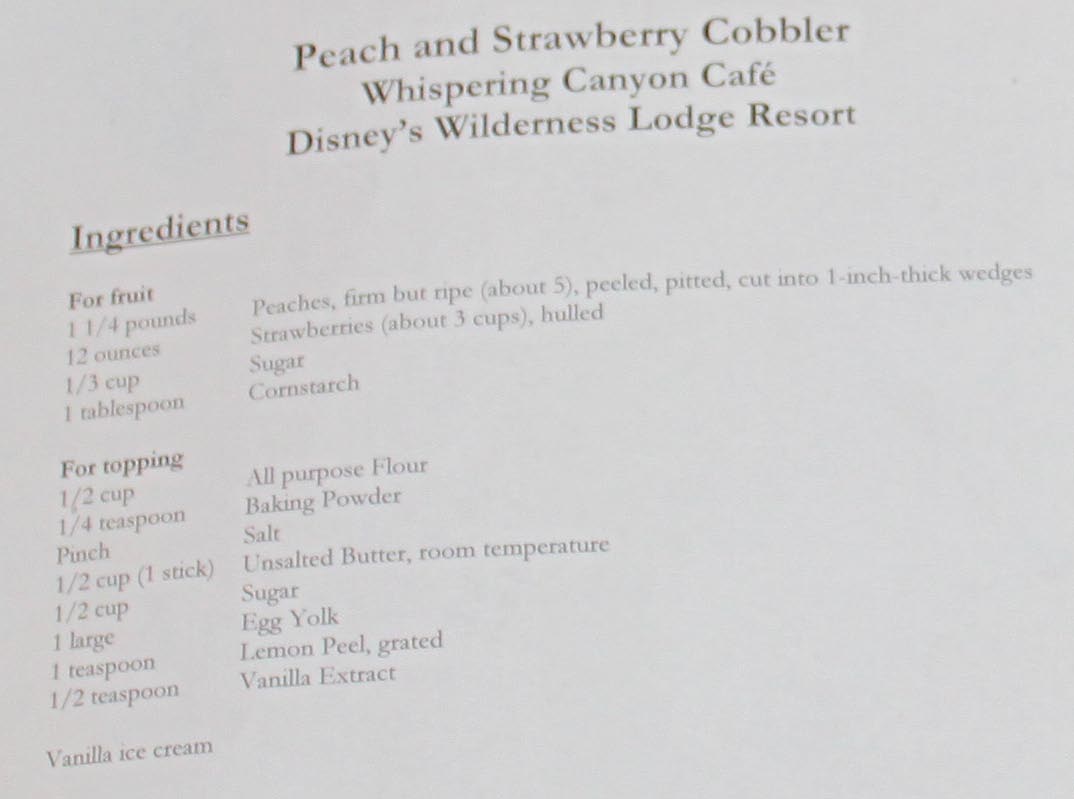
The recipe for the super yummalicious cobbler!
In all it's Deliciousness served in a skillet!

Here it is!  Click the picture to read better.
I tried making this wonderful cobbler last night. it looks fabulous.
I am actually taking it to a friends house this evening to enjoy.
Very simple! Very aromatic, and I am positive it will be Very Delicious!
Just a little Magic sprinkled into our lives until we take our next trip!
And instructions.

Let me know if you try this recipe and what you think of it!

Written by Cindy Fragozo, Your Travel Specialist  at 3D TravelCompany.

Friday, June 24, 2011

Hidden Mickey?


So once again a "not so Hidden Mickey" appeared at the dinner table.
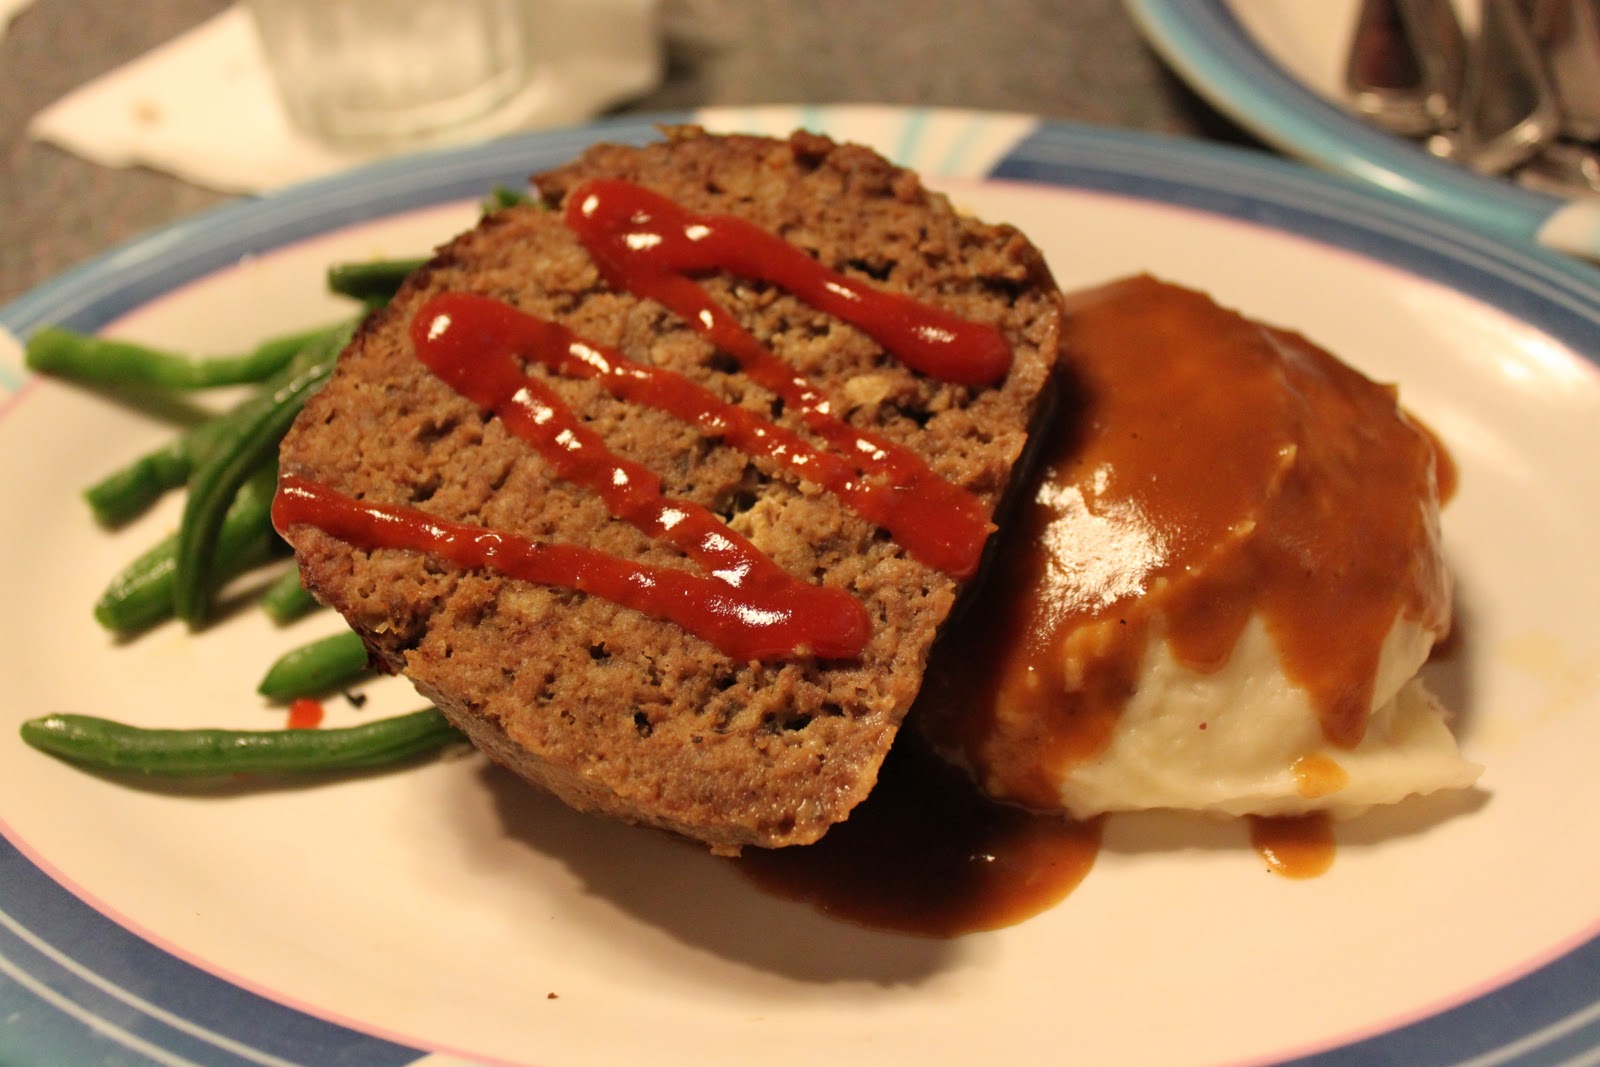
This was dinner that I cooked last Thursday.
My mother asked me to make meatloaf, My husband said "Eeww meatloaf"
So I decided to make it a bit fun, jazz it up a bit.
Why not?
So people who live in my house seem to think I am crazy, but I don't mind, it comes natural to me.
And because the "artsy" me cannot seem to copy a recipe to a T. I have taken a picture of the recipe card for you, so if you feel the need to deviate from the "Original" you may.
~Smiles
~Enjoy

Written by Cindy Fragozo, Your travel specialist at 3D TravelCompany.

Wednesday, June 15, 2011

Everyday food with a little scoop of fun

This is a family staple.
we call it "hamburger, green bean, mash potato"
It is a Shepard's pie of sorts.
I was forced to grind the bell pepper and the onion into a paste to add it in when the beef was cooking for flavor, at the time I had 9 out of 12 very picky eaters.
The 2 serving scoops came in handy when I was trying to entice these picky eaters to try new things.
Here I made a Mickey shape.

Here is the Recipe:
1lb ground beef browned
1/2 cup green pepper chopped
1/2 cup onion chopped
1 can of tomato sauce,add into the meat, onions, and green pepper mixture.
Add 1 can of cut green beans.
1 egg
1/4 cup of milk.
add all ingredients above.
scoop into a 9x11 baking dish and smooth out over bottom.
with instant Mash potatoes make as per recipe on the box for the number of servings.
Scoop out potatoes onto the meat mixture, in any shape you desire. ~Smiles
and sprinkle with cheddar cheese.
~Yum~
enjoy!


Written by Cindy Fragozo, Your Travel Specialist at 3D TravelCompany.

Linking to:


Friday, May 13, 2011

Oreo Bon Bons in my kitchen!

So here they are,
~the good (tasting)
~the bad, (if I would've made the topping myself)
~and the ugly, before the Bon Bon fashion advisor got to them.


filling:
16 oz. heavy cream
6 egg yolks
16 oz. white chocolate
2 T. powdered gelatin placed in 2 oz. cold water
1 dozen Oreo cookies, crumbled
3 dozen Oreo cookies, whole
Topping:
(I cheated!)
16 oz. dark chocolate
16 oz. heavy cream


for the filling: Melt the chocolate.
Whip the cream until consistency of ice cream.

Place gelatin in cold water. Heat egg yolks until warm;
add chocolate, stirring constantly.
Place the gelatin in microwave until gelatin is dissolved.
 
Add 1/3 of the heavy cream to the egg yolk and white chocolate mixture
 mix well.
Add a bit of the cream to the heated gelatin and mix well.
Then add both the gelatin and the chocolate mixture to the remaining whipped cream and fold until incorporated.
Smash the cookies used for the filling in any manner you choose...
I chose this.
sprinkle in smashed cookies,
look who decided to show up!
I was so excited!
I hope he will stay for some Bon Bons.
Mix it up really well, no cookie chunks wanted here.

Let mousse set up, around 2 to 4 hours.


At this point I am what you call a "cheater"
can you see why?
Yes I went to DQ and got their shell chocolate dip in a cup.
This was way more than enough.
Can you imagine a 20 oz cup of warm chocolate?


I laid my Oreos out and scooped on the filling, this wasn't working too well, so I filled a baggie with filling and squeezed a dollop on each cookie.
Yes, I know they aren't beautiful.
It just makes me appreciate the beauty, and yummyness of the "real" thing.
I dipped one by one into the pool of warm chocolate coating.
Some lucky Bon Bons got a double dunk to coat.
Don't you wish you were a Bon Bon?
Here is what my daughter decided to do to help in the Bon Bon fashion dept.

Looks a little better.
And the platter full of Bon Bon goodness!

I made a ton of these, the recipe makes alot.
I used the extra filling and lined a pie plate with Oreos, and filled the pie plate with filling and then topped it with a pool of chocolate.

I offered this at a potluck meal and it was gone before Tink could flutter by!
So here is the Chocolate topping recipe that I did not use, I have to say I have NEVER gotten chocolate to harden EVER.
So after the labor intensive filling making and piping I headed to DQ for their magic sauce.
I didn't want to risk a complete messy gooey ending.

Chocolate topping:
melt the dark chocolate into the cream, until combined.  Dip Oreos into chocolate.

This recipe makes 3 dozen of these little pieces of Oreo heaven.

Warning!!!!  Don't try to eat them all, you will be sick if you do. But I have to say all that work was well worth the taste of these, just like Cape May Cafe...
Ahhh I just cannot wait until September when I can have a real Oreo Bon Bon, without all the work.
Do you want to try these wonderful treats at Cape May Cafe, or even in your own kitchen?
Let me know how they are, and what you think of them!
or let me book your trip for you, and you can enjoy them without the work!
Click Here for your Free quote!

Written by Cindy Fragozo, Your Travel Specialist at 3D TravelCompany.

Wednesday, March 2, 2011

Hidden Who?

Once upon a time Mom found a Mickey shaped piece of metal.

This Piece of metal could be put to many uses...
This is just one.


This was actually a yummy project executed by my husband while I was but dreaming of my Mickey Latte not far away in my cozy comfy cuddleful bed, I honestly think he just wanted to play with my new camera.
So all pictures and food made herein are credited to Mr. Ice cream sandwich man. :)

My dear husband must have  enjoyed the camera time, because there were around 100 biscuit pictures on my camera to choose from.

There wasn't even flower on the camera, but it was all over the stone!


And in the oven...
And on the table with steam billowing from the top...
This is what i woke up to...

Yum!
What would you do with your Mickey cookie cutter?

Wednesday, January 12, 2011

A blast from the past!

Girls Night at Disney's 50"s Prime Time Cafe,
at Disney's Hollywood Studios Park.
Every table has its own kitchen setting with a tv
that plays old black and white shows reminiscent of the days gone by.

This was a huge treat for me as I had never been to this Cafe, but had always wanted to go.
This was the night, and it was Girls night!

 Here are a few of the menu offerings we tried out.
and look at those prices...
Not too shabby for dinner  prices!
 I would suggest this for anyone that may not have the dining plan,
(which I highly suggest)
wanting a sit down meal,

 Fabulous Meatloaf!
Pot Roast, Yum!
Both were fabulous,
as well as the Chicken noodle soup! Yum!

" Get those elbows OFF the table!"
So, I have to say they all have a thing about having your elbows on the table,
 and eating all your veggies too.
Here we are with our "Auntie" (server)
What a great memory!
I want to hit this Cafe with my family!
That should be loads of fun!
Cant wait for September 2011!

Written by Cindy Fragozo, Your Travel Specialist at 3D TravelCompany.

Friday, January 7, 2011

Is sushi scary?

I have to tell you I have ALWAYS wanted to make sushi.
I have never had the guts to do it. When I was posting about Japan when I started my blog was a great time to try. Yes I know that was long ago. But here was my endeavour with sushi making.
There are so many recipes online for sushi rice.
Most contain rice wine vinegar and sugar.
Cook up your rice as directed on instructions and mix the sugar vinegar mixture into the rice.
Grocers sell sushi rice,(check out the Asian food section of your supermarket)
 this is one of those things you do not want to use minute rice for.
I have read it will not be sticky enough to roll.

 Nori, I have had these packs for some time waiting for this special day.
Here are 2 different kinds.
basically this is a thin sheet of dried seaweed.

 You will also need a sushi rolling mat to make the life of a sushi roller a little easier.
 When I started I put WAY too much rice, so a thin layer is good remember you must roll it.
stack ingredients in the middle, I used crab, cream cheese, shredded cucumber, and avocado.

 Now roll, very carefully, pulling the sushi mat toward yourself and squishing just a little as you roll.
Here you see too much rice and a little bit on the insides squishing out.
Hey, I never claimed to be a professional!

 Voila! end roll!
I did read it is easier to use plastic wrap to cover your sushi mat so the stray rice does not stick to the mat.
I did find this helpful, about halfway through this sushi making fun.

Now slice those suckers up and drizzle some Spicy Mayo on them.


I do have to say I would do it again. It was good, but I will see if I can buy some real sushi sauce for the rolls or at least get the right ingredients to make it next time.
 (Spicy mayo just isn't the same with chili powder... Hey the recipe is just a guide book right not the written rule? Cooking is an art form not a science? Yes there are those of you out there, you think I might just be struck down by lightning for deviating from a recipe. ~smiles Mom! ~smiles I am still alive, just wouldn't try the spicy mayo without the right ingredients again. ~smiles)
I would love to hear if you have ever tried to make sushi, or if you ever would try.

Written by Cindy Fragozo, Your Travel Specialist at 3D TravelCompany.

Friday, December 3, 2010

Mushed up cake and icing to make a cute treat for all to eat!

Good Gravy! Wow Thanksgiving is but a day in the past!
So quickly it came and was fabulous, and then so quickly it was over.
 A full week flashed before my eyes and I did not even notice it!
So now I am posting crafting my way to Christmas!
(While chewing gum of course!)

So today we are making cake balls. Yes cake balls.
I know I got a bit crazy gum balls and cake balls in the same week!
 I have always been super afraid of these after one EPIC fail at trying to make them,
 which left me frustrated, and swearing them off for eternity.
(making them of course, not eating them  ~smiles). 
So I have a fabulous friend who has been making these suckers since she was knee high to a grasshopper, ok, well maybe not that long, but I just felt the need to say "knee high to a grasshopper" you get the point. 
Here is what we used and a peek at her "secret recipe" 
 (sorry girl, don't tell "Duke" the dog, or me anything, we might just spill the beans) 
  • a box of cake mix made into the cake of your choice (devils food)
  • Icing (chocolate, we used whipped icing) said friend took it out back and roughed it up.            ~Smiles ok, I know, CHEEZY! but I just had to.
  • Nuts and chocolate chips
  • meltable dipping chocolate
(yes, I put foil on the cake pans for the sake of quick clean up, and it worked!)
the secret recipe calls for devils food cake,
 but I not liking to follow directions very well am using German Chocolate.
Now smush it all up with your hands.
Now to add about 3/4 tub of store bought Icing
and desired nuts and chocolate chips (optional, but part of the "secret recipe")
  • Nuts
  • Chocolate Chips

Then there is lots of mixing and smooooshing again with your CLEAN HANDS.
Now roll them into small balls and place them on a foil, or waxed paper lined cookie sheet.
These will go in the freezer or fridge to firm up so they can take a dip into the chocolate pool.
How round and perfect!
  • Meltable Chocolate
Now it the time to melt the chocolate.
We used the microwave in 30 second intervals being very careful not to burn it.
**Note** I do have to say you should buy chocolate, not use what you bought 6 months ago for baking and never used it. We tried that, I was going to attempt making these about 3 months ago and that chocolate was a little less than perfect. it did taste good, it was just really thick, and hard to dip into in a thin pretty coat.

Now for a dip in the chocolate pool!
use a fork and a spoon to roll around and fully coat each ball.
lift up with the fork and scrape the bottom
of the fork on the bowl to take excess chocolate off.

Place on the foil/ wax paper cookie sheet and let sit until coating hardens.
I do have to admit these are what I ment by not pretty dipping.
Even my friend (who is an expert) had trouble with this chocolate and making it look good.
So here is my final product...
  • Necco wafers, added before the chocolate hardened (ok, I admit,I added this, it is not part of the secret recipe, but like I said i have trouble with directions, and they make such CUTE ears!) I also added a fruit roll up bow for Minnie.
How FABULOUS are these cute little guys?
I am in love!
And thanks to a WONDERFUL friend,
 I am no longer afraid of the simple cake ball or truffle as she likes to call it.
and chocolate lovers around my house are so happy they may see these again very soon!
I would love to hear if you have made these in the past,
or if you plan to make them in the future.
Will you give them ears?

Written by Cindy Fragozo, Your Travel Specialist at 3D TravelCompany.